Going Online, Compare & Download
When you go online with a PLC, AnyAutomation Studio opens an engineering connection to the controller CPU. This connection is for transferring and comparing engineering data — not for continuously watching live values. To read, write and watch individual tag values cyclically, use the Tag Browser in the PLCSim Advanced panel (see Hardware Simulation).
License requirement: Going online/offline with a PLC, the online/offline compare, and downloading or uploading to a device are part of online commissioning and are included from the Pro+ plan; the free trial unlocks them too.
Going online / offline
Right-click a PLC in the project tree and choose Go Online from the context menu. A connection dialog opens (see below) where you pick the connection path and confirm with Go Online. If no offline project is known yet, Studio first prompts you to select the offline TIA project file (.ap*) to compare against. Use the same right-click to disconnect again with Go Offline. While the PLC is online, the same context menu also offers Refresh Compare, which re-runs the per-block comparison.
You can also go online from a project you opened offline from disk (without TIA Portal); see Project Management for opening a project that way. Select the CPU, choose Go Online and confirm the dialog, whose address is already filled in from the project. From such a project, the online/offline compare and Live Values cover SCL and STL code blocks.
If the CPU is access-protected, Studio prompts for a user name and password when going online. Enter the credentials for your access level; if you only have a password, leave the user name empty. With the correct credentials the CPU is read and compared with your own access rights. On a wrong password Studio prompts again; press Esc to cancel. Credentials are never stored and are requested again each time you connect.
A status badge on the PLC shows the connection state — Online or Offline. It reflects only whether a connection exists.
The connection dialog
The dialog is modeled on TIA Portal's own go-online dialog:
- At the top, the Configured access nodes table lists the CPU's configured interfaces: device, slot, interface type, address and subnet. The table is for reference only and cannot be edited.
- Below it you pick the connection path: Type of the PG/PC interface (e.g. PN/IE), PG/PC interface (your network adapter, such as the PLCSIM virtual adapter) and Connection to interface/subnet (direct at a slot or via a subnet).
- The Address field takes the target IP. It is enabled when the connection goes via an address; with an invalid address the Go Online button stays disabled.
- Start Search scans for reachable devices on the selected interface and lists them. Clicking a result (or pressing Enter on it) adopts its address. On interfaces that connect directly at a slot, the search is unavailable and a hint in the dialog says so.
- Go Online connects; Cancel closes the dialog without going online.
The dialog remembers your last confirmed choice per PLC and preselects it the next time it opens. Reconnecting is usually a single click or Enter.
If connecting fails, a notification shows the error. Problems during the device search appear inside the dialog.
Older CPUs without secured communication
Some older S7-1500 and S7-1200 CPUs do not support the secured communication that newer firmware uses. Studio detects this while connecting and then connects automatically, with nothing for you to switch; no extra step is needed.
Because such a connection is unsecured, Studio makes that clear:
- After going online, a persistent notice states that the connection is unsecured.
- In the project tree the PLC also carries a yellow UNSECURED marker; hovering it shows an explanatory tooltip.
Treat values shown over an unsecured connection accordingly: they are not protected against tampering in transit. Where newer firmware allows a secured connection, or where OPC UA is available, that is the more protected choice.
Live values in the block editor
Open one of a PLC's program blocks from the project tree and switch on Live Values to watch the block run. If the PLC is not online yet, switching it on first opens the connection dialog; once you are connected the values appear automatically. Each variable in the source shows its current value inline, right next to where it appears, and updates as the program runs. This works for the block's inputs, outputs and global tags as well as its local and temporary variables.
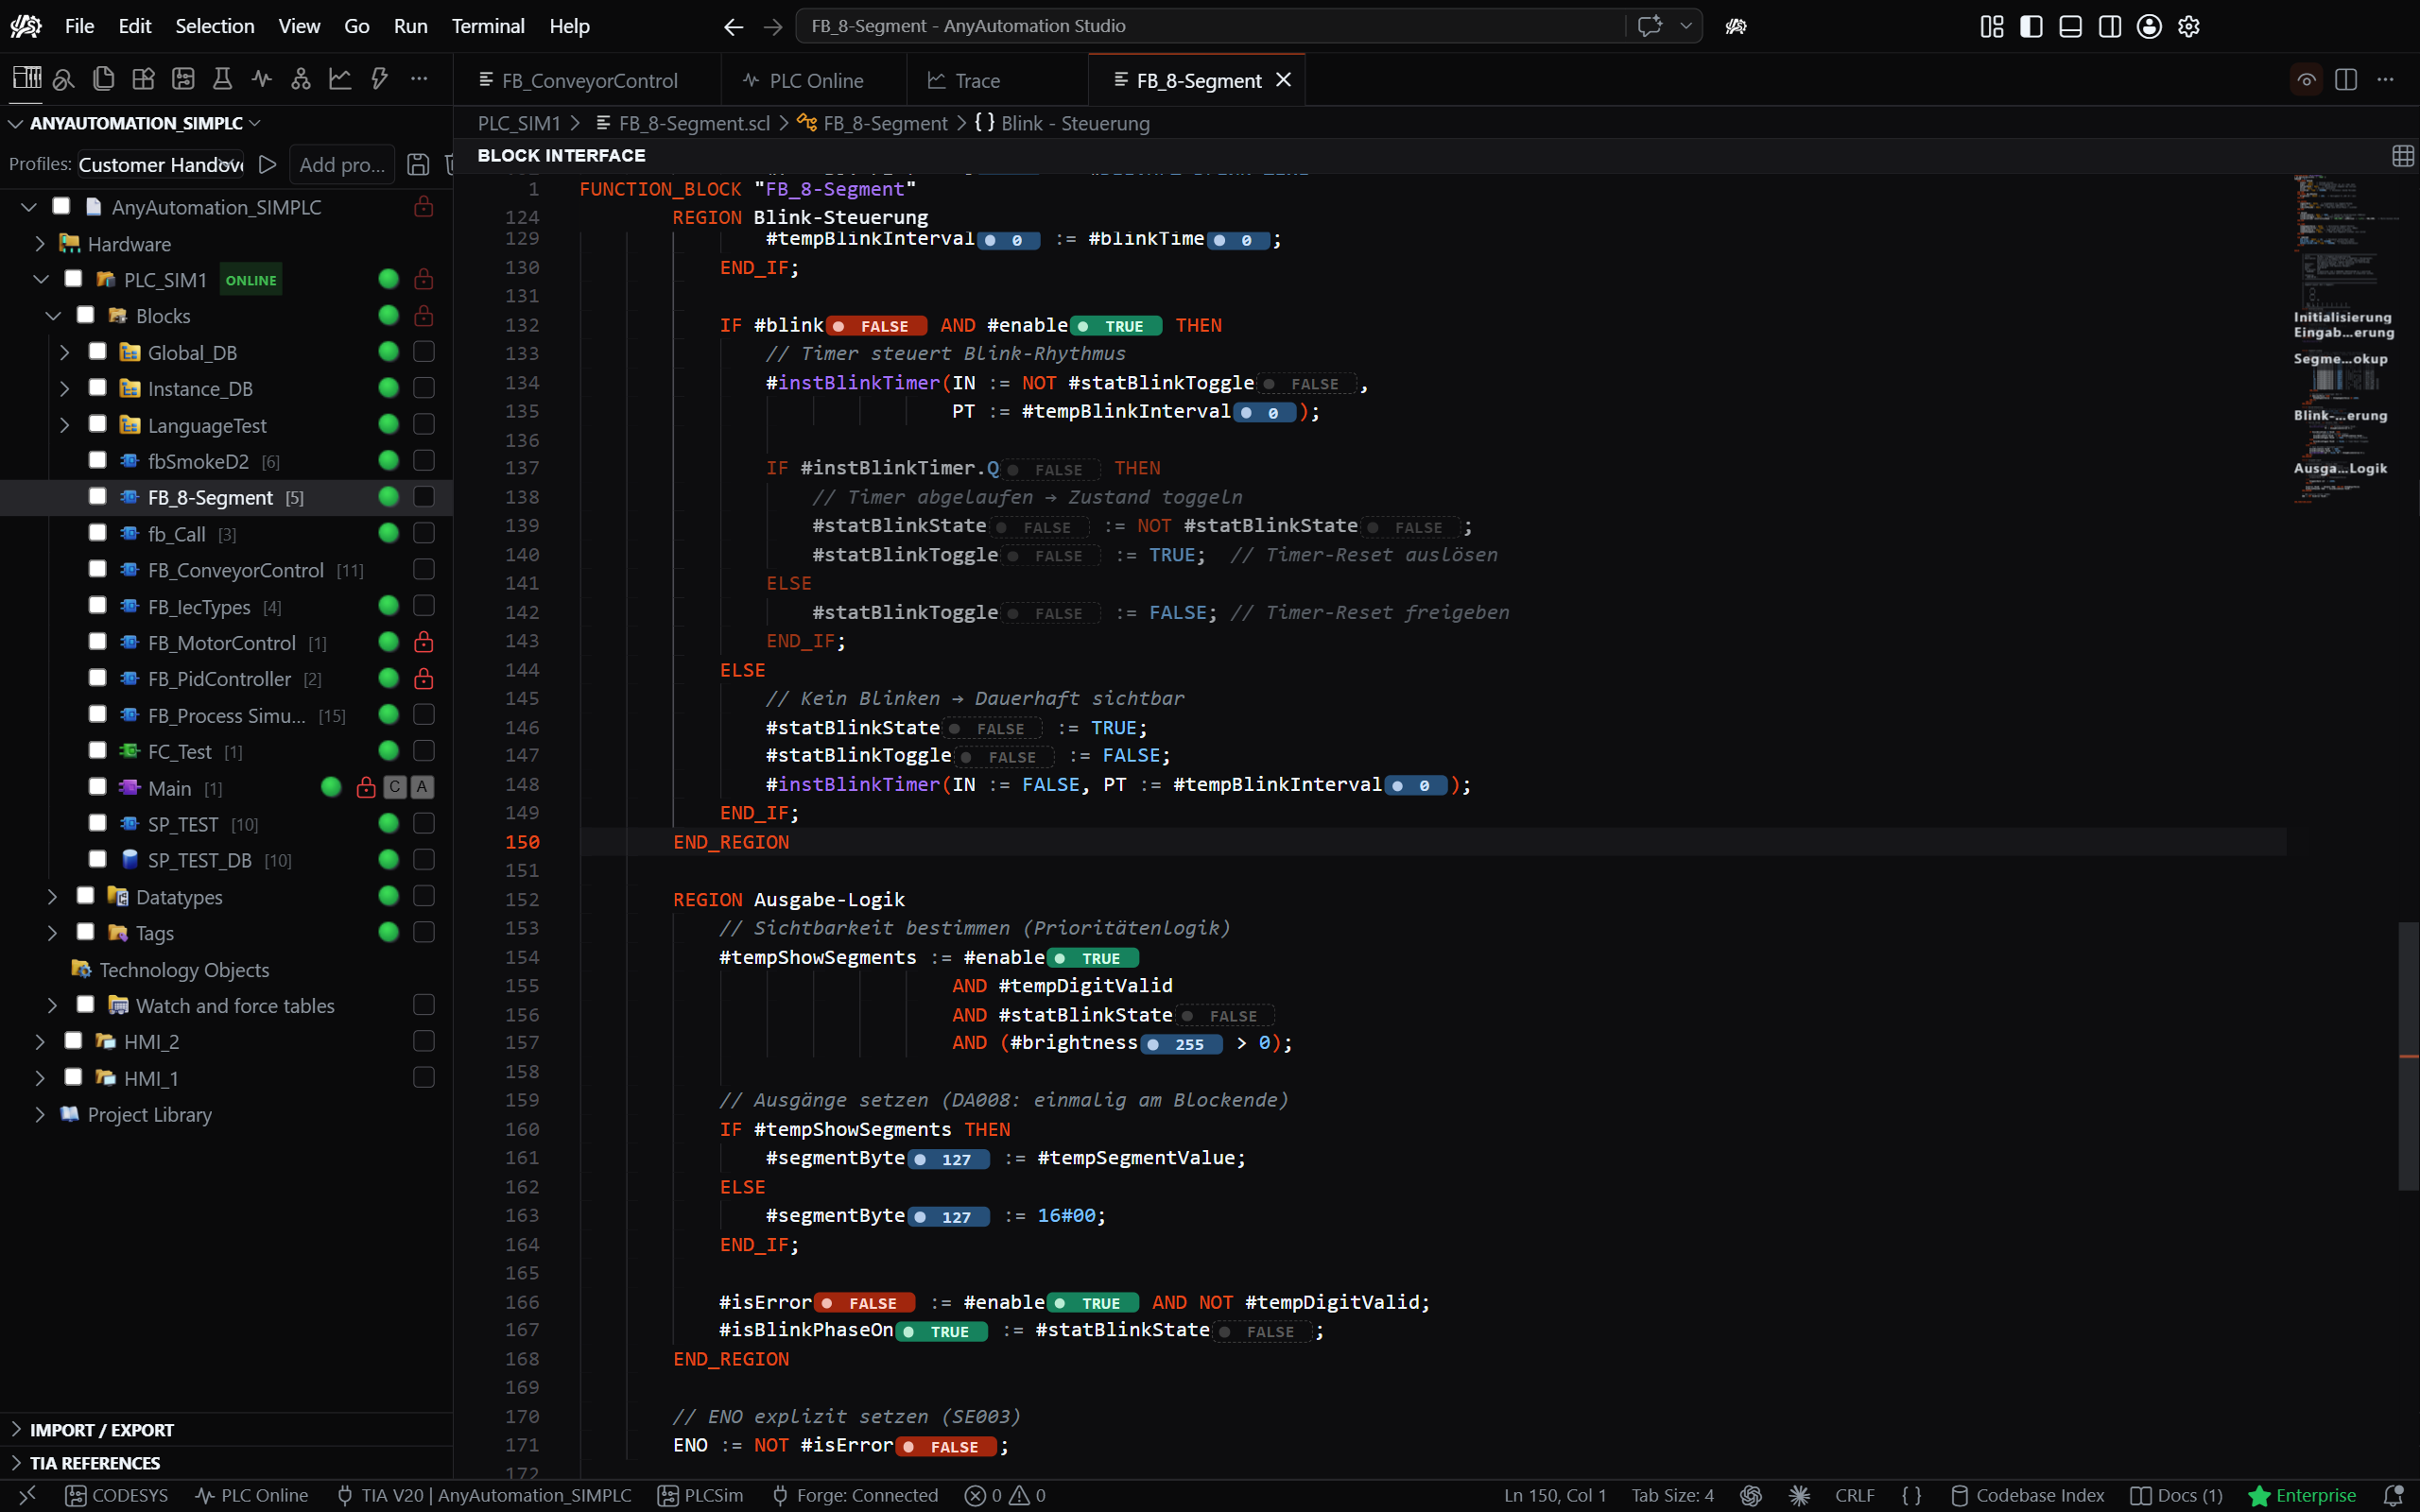
- Hover a variable to see its value and data type in a tooltip.
- Pin a value to keep it shown on its own line above the code, so you can follow it while you scroll.
A value is shown only while that part of the program is actually executing; a variable on a line the CPU is not currently running appears greyed out until it updates again.
You watch data blocks the same way. Open a data block from the project tree and its declaration table appears. Monitor Data Block switches on a Monitor value column that shows each variable's current value and keeps it updated while the PLC is online. The values stay visible even while you edit the declaration.
Per-block online/offline compare
As soon as the PLC is online, each block in the project tree shows a compare badge on the right that reconciles the offline state in the project against the online state on the CPU. The possible states are:
- Identical — the block's offline and online state match.
- Different — the block exists on both sides but differs.
- Offline only — the block is present in the project but missing online on the CPU.
- Online only — the block is present online on the CPU but missing from the project.
Folders in the project tree carry a summary badge too, so you can spot where something changed without expanding every folder. A folder shows a green "identical" badge when every block inside it matches the CPU, and a "differences below" badge when any block inside it differs (or is offline only / online only). Folders with nothing to compare inside stay blank. The same rolls up to the PLC itself.
The comparison uses TIA Portal's own compare engine. The states shown therefore match exactly what TIA Portal's online/offline compare reports for the same PLC at the same moment.
Compare Editor
The per-block compare badges only tell you that a block differs. To see what differs, click the Compare Editor icon in the Activity Bar: the Compare Editor opens right away in the editor area, and the side bar stays as it is.
At the top of the editor, two boxes name what is compared:
- Source is the project and the PLC you compare. The project list shows the projects you already have open, plus Attach to Running Instance and Open TIA Project if the one you need is not open yet.
- Target is what you compare against: a Folder, which is your export folder (its path is shown next to it) or any folder you browse to with Choose a Folder, or a second Project with its PLC.
A box keeps a coloured border until its side is chosen. Then press Compare. To compare something else, change the project, the PLC, the comparison type or the target folder right there and press Compare again, there is no need to close the editor and start over.
- Studio compiles the source project and works out the differences. The progress names each step and counts the items while it checks the PLC for changes, and the operation can be cancelled. The first comparison with a folder exports the PLC once; later comparisons read again only the items that changed. Pressing Compare while the comparison is still refreshing itself after an import or a save shows that refresh to its end.
- When the compare finishes, every block, data type and tag table is classified — Changed, Only in the source, Only in the target, Unchanged, Inconsistent or Not compared; the two "Only in" entries name the project and the folder (or the second project) directly. The header shows the count per state, and every count is a filter button: activate one or more to narrow the list to those states, press an active one again to release it, and a seventh button, Does not exist, narrows the list to every item that is missing on one side. Activating a changed row opens a side-by-side diff of the two sides.
- The list shows both sides next to each other: the item on the source side on the left, its status in the middle, the same item on the target side on the right, with the two sides named in the column header. Where an item is missing on one side, that side reads Does not exist, folders included.
- The three columns are separated by lines you can drag: pull a line to give one column more room, the header and the whole list follow while you drag, and a double-click puts the columns back to their standard proportions. Your widths are kept for the next time you open the Compare Editor.
- Where TIA records it, each side of a row shows who last changed the item and on which day, and hovering that side adds the author, the creation and the last change with the full time. TIA keeps this only for code blocks, so data blocks, data types, tag tables and technology objects show nothing here, as does the folder side of a folder comparison.
- Nothing is selected for you. A finished comparison starts with no check marks, so what Import Selected, Export Selected or Copy Selected touches is exactly what you ticked. Ticking a folder ticks everything inside it. Each new comparison starts empty again.
- Above the list, a filter row offers the buttons OB, FB, FC, DB, UDT and TAGS, each showing how many items were found. Activate one or more buttons to narrow the list to those block types; with no button active you see everything. Check marks are kept while filtering; the buttons act only on the checked rows that are currently visible. When the comparison contains fail-safe items, the row also shows S_OB, S_FB, S_FC, S_DB and S_UDT for the fail-safe blocks and data types. Every item is counted by exactly one button: FB counts the standard function blocks and S_FB the fail-safe ones.
- Next to those buttons, a search box narrows the list to what you type, matching the item name and its folder path; several words all have to match, and the matching characters are highlighted. Esc clears it. The button beside it switches the folder structure off, so you get one flat list with each item's folder shown next to its name.
- A shield button in the same row hides every safety block, leaving only the standard blocks in the list. Its tooltip shows how many entries it would hide, the counts above the list follow it, and the setting stays on until you switch it off, also after a new comparison. Hiding the safety blocks also releases any S button that was active. Blocks whose name merely starts with F but that are not fail-safe stay in the list.
- Comparing against a folder: to adopt folder-state items into your project, check their rows and press Import Selected. The selected items are imported into your project and the comparison refreshes afterwards, exporting only what changed. The first comparison against a folder exports the PLC once; later ones check it for changed items and export only those, also after a restart of Studio.
- To bring the folder up to the state of your project, check the rows and press Export Selected. Changed items and items only in your project are exported into the folder with your export settings and replace the files that were there. Checked items that exist only in the folder are deleted from it after you confirm; Studio moves them to the trash where it can. The list updates right away without checking the project again.
- Comparing against a second project: check the rows you want and press Copy Selected, which copies them into the other project; the Swap source and target button turns the comparison around, so you can copy in the other direction. Blocks that belong to a software unit are copied without the unit's namespace preset — set it on the target project yourself.
- Merging in the diff. In a project comparison the target side of an opened diff can be edited: type in it, or use the arrows in its margin to take a block of changes over from the source side, then save with Ctrl+S. Saving writes that item into the target project and the comparison refreshes. The source side stays read-only so the direction is unambiguous; use Swap source and target to merge the other way. In a folder comparison the exported file on the right is a normal file that you edit and save as usual. If the project refuses the item, the save reports why and keeps your changes.
- Graphical blocks side by side. Right-click a row whose block is written in LAD, FBD or GRAPH and choose Open in Automation Compare Tool. The SIMATIC Automation Compare Tool installed on your PC opens with the source side on the left and the target side on the right, each under its own caption, so you see the differences in the networks instead of in the exported text. A row that exists on one side only opens that side alone. If one side cannot be provided, the other one opens alone and a message names the reason. The entry is offered for graphical blocks only and not for know-how-protected blocks, and it is greyed out while another TIA Portal operation is running. The tool is a separate product that has to be installed on your PC; it opens in German when Studio runs in German and in English otherwise.
When an item cannot be compared. An item the comparison could not fetch from your project reads Inconsistent when it is not compiled, and Not compared in every other case. The status then names the reason: Not exportable, Path too long, Not found, Not exported, Not readable or Export failed. Hover the status to read what you can do about it. Such a row cannot be ticked, neither by clicking its check box nor through the tick on its folder or in the header, and Import Selected and Copy Selected never touch it. A row whose file is present in the folder stays tickable, so you can still import it into your project. Opening such a row shows only the side that has a file; when neither side has one, a message names the reason.
Warnings after a comparison. When the PLC compiled with errors, a warning says how many, and items that are not compiled stay Inconsistent until you compile them in TIA Portal. A separate warning appears when the safety program of that PLC is protected by a password and you are not logged in to it, because its changes cannot be compiled that way. When the compared project is the one Studio is working with, the warning offers a Safety Login button; a login you make in TIA Portal itself counts just as well. Log in and compare again.
Line endings do not count as a difference. An item whose two sides differ only in their line endings, or only in an invisible mark at the start of the file, is shown as Unchanged. Exported files keep the line endings TIA Portal writes, so a version control system no longer reports a whole file as changed after an export. After you update Studio, the first comparison against an export folder you already have takes the slower route once and is quick again afterwards.
Know-how-protected blocks cannot be imported or copied. Your project only changes when you import or copy.
Items marked as protected with the red lock in the project tree stay unchanged when you import or copy, and the message says how many there were. Saving in the diff also refuses a marked item with a message; for a marked organization block with A on, only its attributes are saved. Items of the safety program are only changed while you are logged in to the safety program; without the login they stay unchanged and a warning offers Safety Login. More about this in Protected Items.
The Compare Editor is included from the Basic plan, and the PLC does not have to be online for it.
Download to Device
To transfer your project's program and hardware configuration to a CPU, right-click the PLC in the project tree and choose Download to Device.
- Choose the network adapter and address. The connection dialog opens (the same one described above, now titled Download to Device). Pick the PG/PC interface — your network adapter, such as the one wired to the controller — and the Address of the target CPU. You can type the address or find it with Start Search. Your last download choice for that PLC is preselected the next time you open it. Confirm with Download.
Review the impact and confirm. Before anything is transferred, Studio checks what the download will do and asks you to confirm:
- If the change cannot be applied to the running CPU, a warning tells you the CPU will be stopped and its data blocks reinitialized — all current and retained values are lost.
- If the change can be applied without stopping, it tells you the download loads in RUN mode and the CPU is not stopped.
The confirmation names the CPU and the target address. This check changes nothing on the controller; it only reports what would happen. Choose Cancel to leave the CPU untouched.
Download. After you confirm, the download runs with a progress notification that you can cancel. On success you get a confirmation; if it fails, a notification shows the reason.
Only a full download (program and hardware configuration) is offered. If a connection or the download fails, the notification shows the error.
Downloading to a device is part of online commissioning and is included from the Pro+ plan; the free trial unlocks it too.
Notes
- The engineering connection is not meant for continuously watching live values. Use the Tag Browser for that (see Hardware Simulation).
- The compare badges appear only while the PLC is online; they are not shown in the offline state.